This article provides details of Workspace ONE UEM, Access and Okta IDP integration.
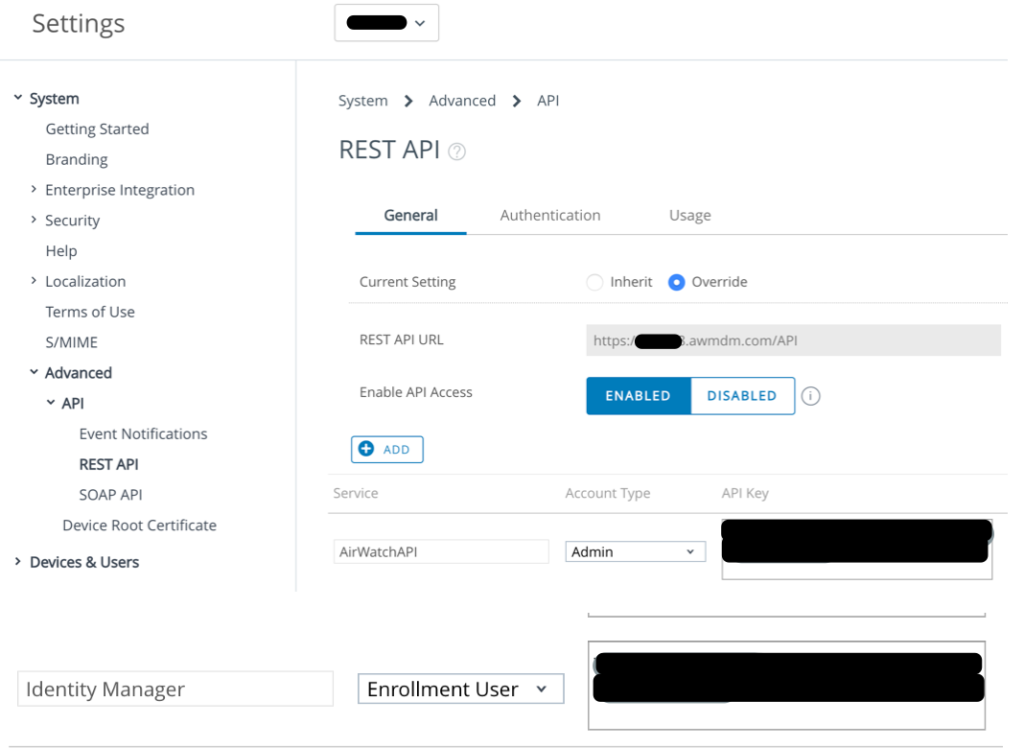
Enable REST API.
Navigate to Groups & Settings > All Settings > System > Advanced > API > REST API and select Override
Click on the Add button, and provide the following information: • Service: Identity Manager.
• Account Type: Select Enrollment User
5. Select Save.
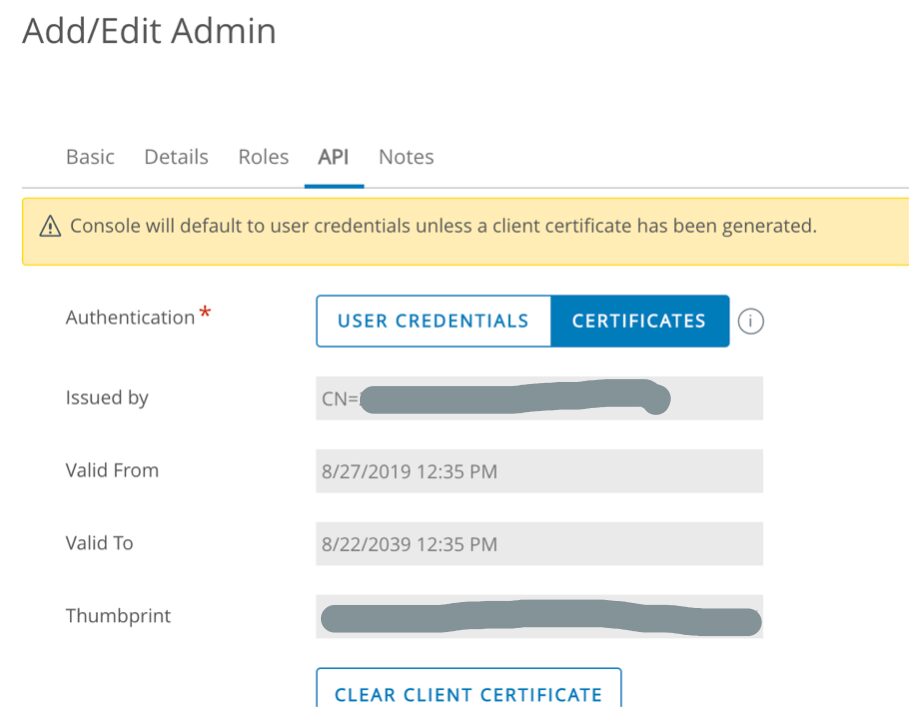
Creating Admin Account and Certificate in AirWatch
Navigate to Accounts > Administrators > List View. Select Add > Add Admin.
The Add/Edit Admin page appears.
In the Basic tab, enter the certificate admin user name and password in the required fields.
IMPORTANT: Ensure the Organization Group shown in the form is the same organization group that the Rest API key was created.
Click in the Role box and select AirWatch Administrator. Select the API tab and in the Authentication field, select Certificates. Enter the certificate password. The password is the same password entered for the admin on the Basic tab.
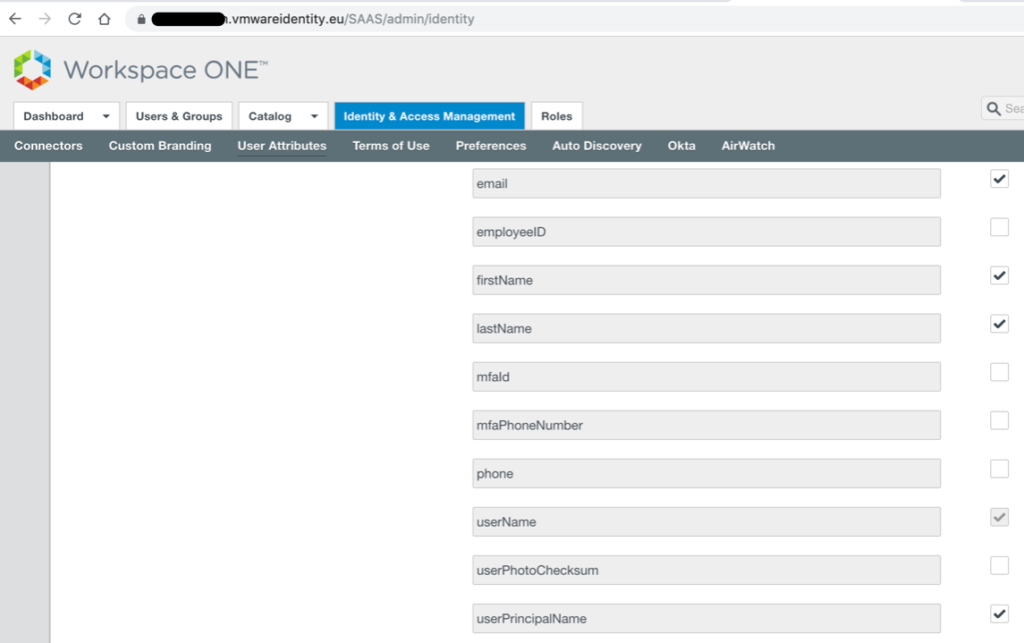
Setting up an AirWatch Instance in VMware Identity Manager
Navigate to VMware Identity Manager Admin Console (in order to bypass Access Policies and login as Admin, type the tenant URL: https://xyz.vmwareidentity.eu/SAAS/auth/0). Navigate to Identity & Access Management. Select the Setup button on the right-hand side of the screen. Select User Attributes. The User Attributes page appears. Check the Required box next to userPrincipalName and select Save
While still in the Setup section of Identity & Access Management, select the AirWatch tab. The AirWatch page appears. Enter the AirWatch integration settings in the following fields.
Enter assigned AirWatch API URL for the AirWatch server where you pulled the AirWatch API.
Upload the certificate file used to make API calls.
Upload the .p12 file you downloaded from the AirWatch Admin Console. Enter the certificate password. Enter the AirWatch API Key value; The key is in the REST API under Settings. Enter the Identity Manager API Key for an enrolled user value. Enter the AirWatch Group ID for the customer type OG where the API key and Admin Account were created in.
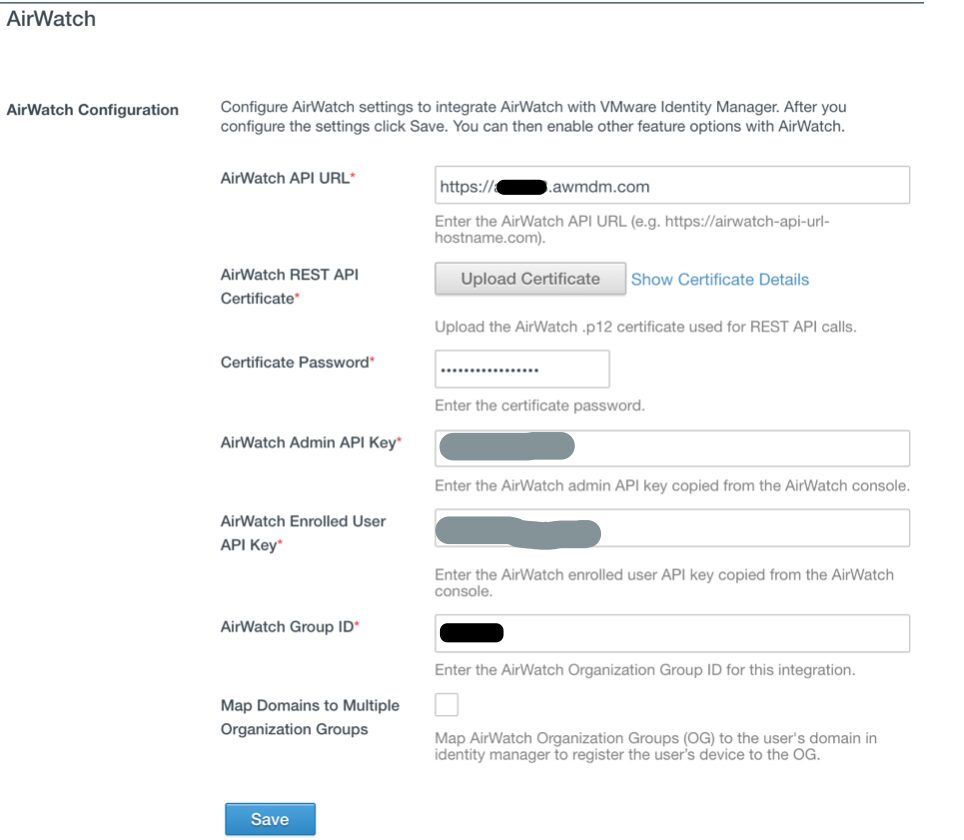
In the same screen, enable the “Compliance Check” through AirWatch as well.
Navigate back to Identity & Access Management tab and select Manage. Click on the Authentication Methods tab and enable Device Compliance (with AirWatch).
Next, Select the Identity Providers tab under Identity & Access Management and select Built-in. In the Authentication Methods section, check on the following: Device Compliance (with AirWatch).
Setting up Certificate (Cloud Deployment) authentication method
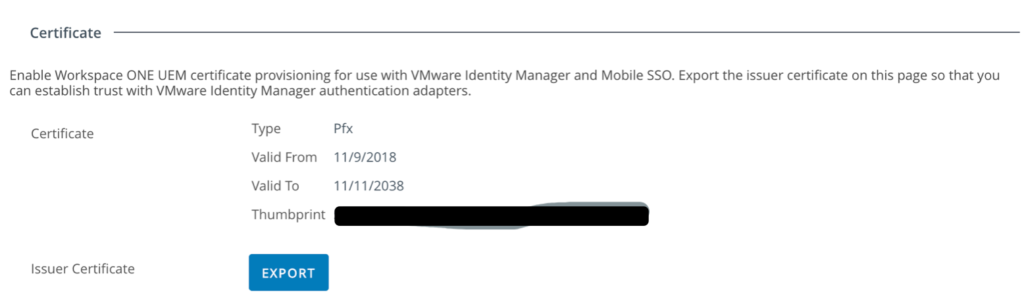
Download the KDC certificate from the Airwatch console under Groups & Settings > All settings > System > Enterprise Integration > VMware Identity Manager > Configuration. If it is not enabled then enable it and then download.
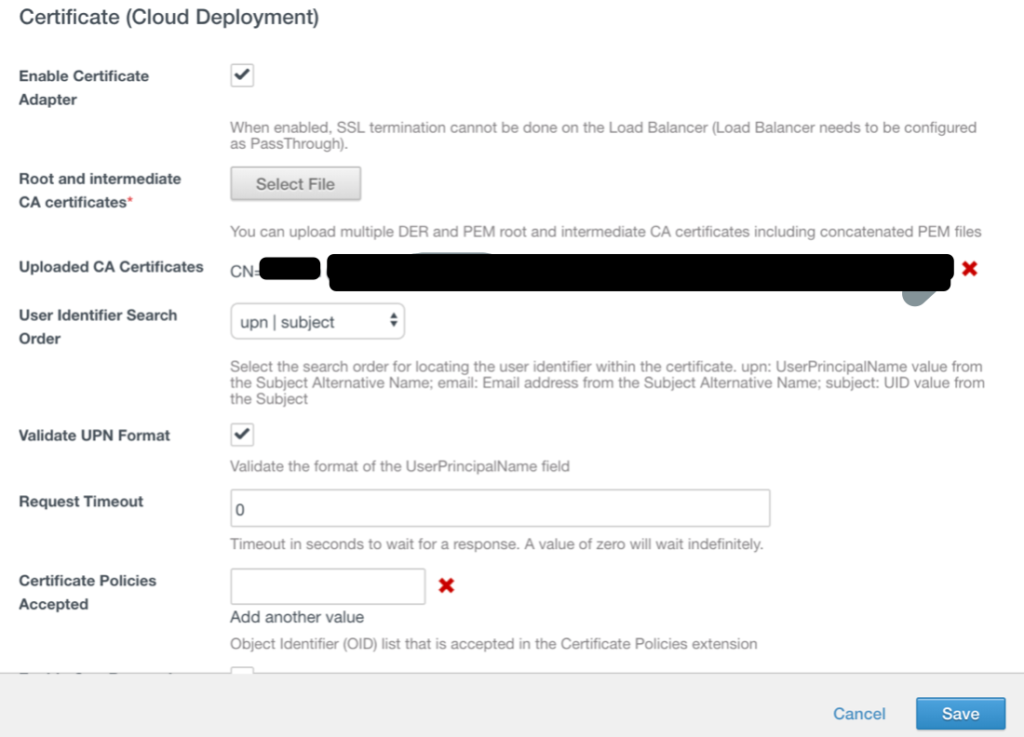
Go to vIDM console. In the administration console Identity & Access Management tab, select Manage> Authentication Methods. In the Authentication Methods section, click the Certificate (Cloud Deployment) icon. Check the box for Enable Certificate Adapter. Upload the Root CA certificate that you obtained from the AW console and save changes
Go to AW console go to Devices > Profiles & Resources > Profiles. Click on Add > Add Profile. select Windows > Windows Desktop > User Profile. Configure the General Page and define a Smart Group (you can select All devices at Organization if you want to push profile to all devices).
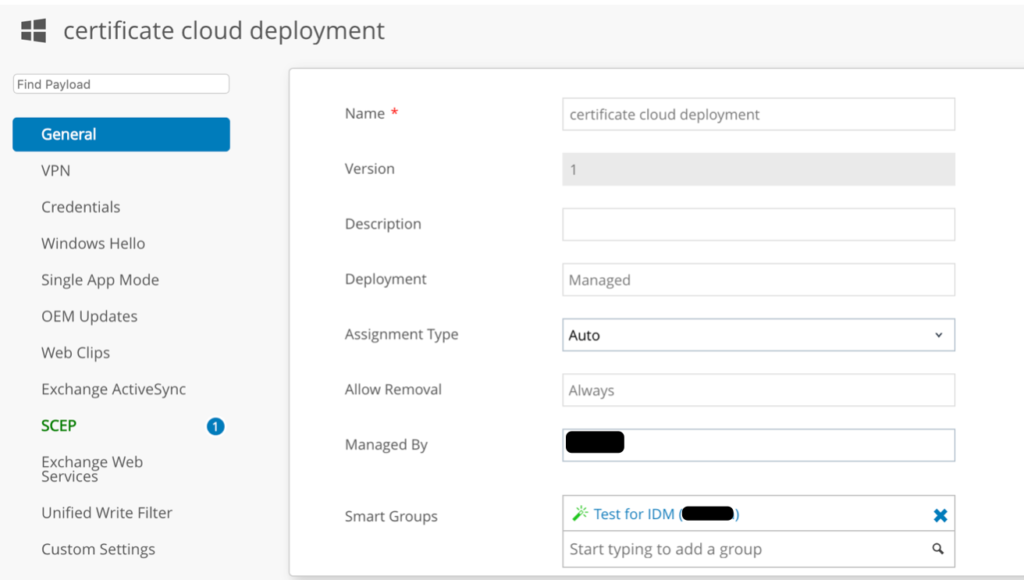
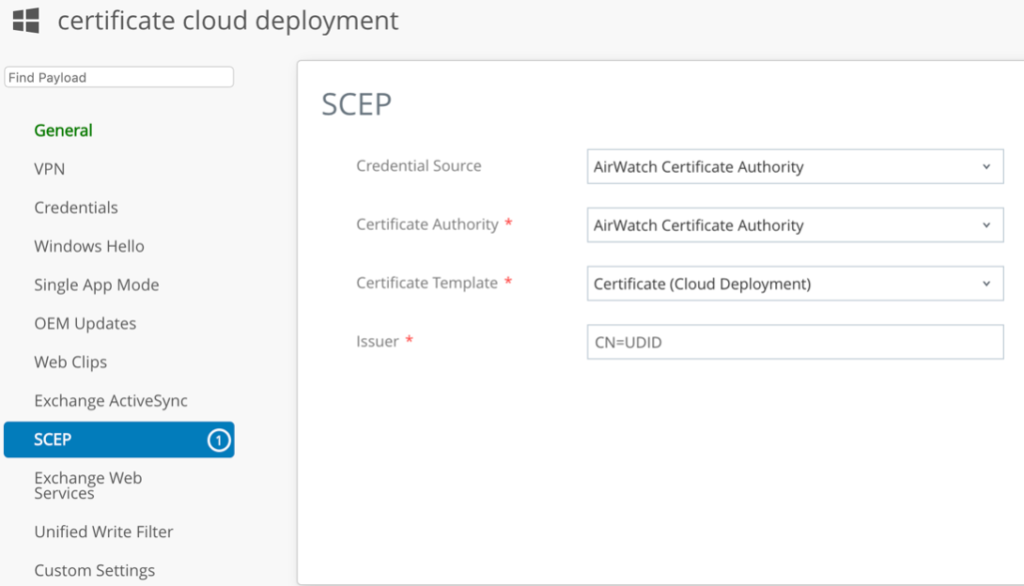
Configure SCEP Payload as follows:
a. Credential Source -AirWatch Certificate Authority
b. Certificate Authority -AirWatch Certificate Authority
c. Certificate Template -Certificate (Cloud Deployment)
Issuer -CN=<Any Name>
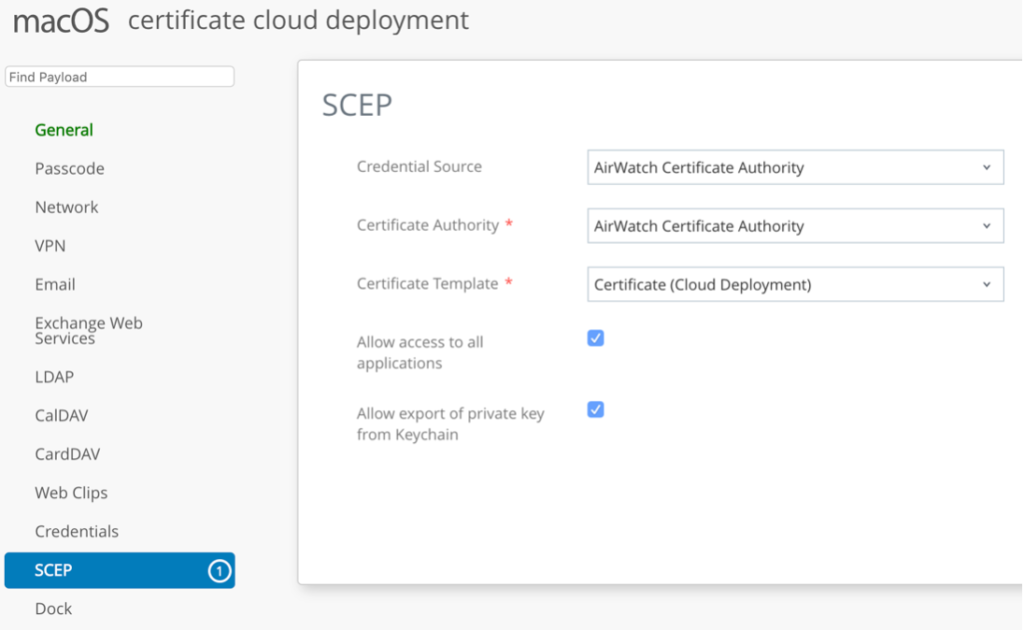
Create one more profile for MacOS:
Setting up Authentication Policy.
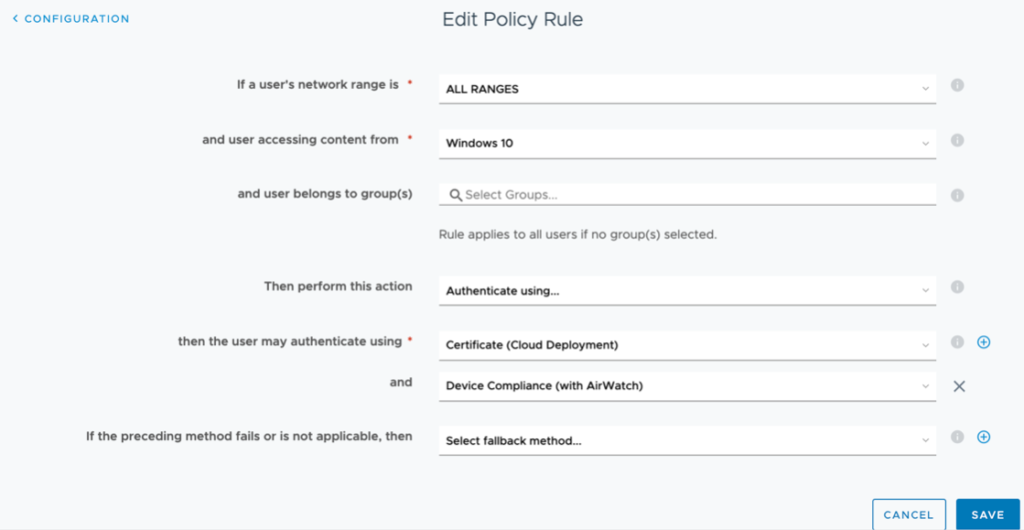
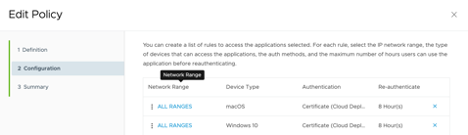
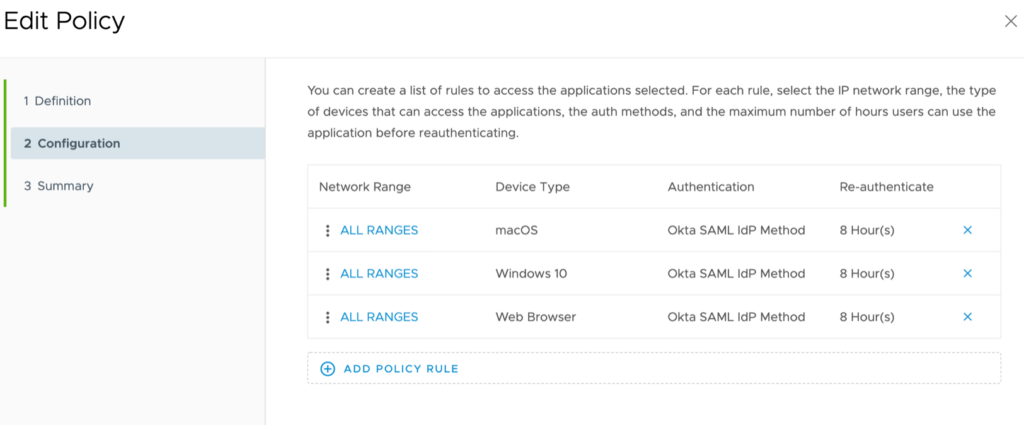
Navigate to VMware Identity Manager Admin Console. Navigate to Identity & Access Management > Manage > Policies. Click on Add Policy and define the name. Define the Policy rule as per the screenshot:
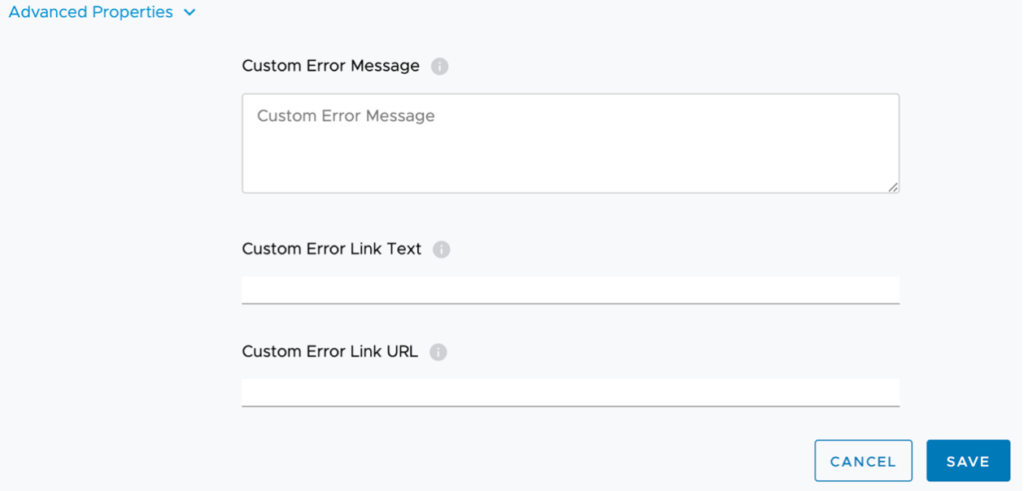
Expand Advanced Properties and configure custom Error Message:
Create same policy for MacOS and move both to the top:
Save the configurations.
At this stage you can test compliance policy by accessing to VIDM catalog as a basic user from Windows or Mac device.
Integrating vIDM (Access) with OKTA as 3rd Party IDP
What is Okta?
Okta is the leading independent provider of identity for the enterprise. The Okta Identity Cloud enables
organizations to both secure and manage their extended enterprise, and transform their customers’ experiences.
With over 5,500 pre-built integrations to applications and infrastructure providers, Okta customers can easily
and securely adopt the technologies they need to fulfill their missions. Over 4,000 organizations, including 20th
Century Fox, JetBlue, Nordstrom, Slack, Teach for America and Twilio trust Okta to securely connect their people and technology.
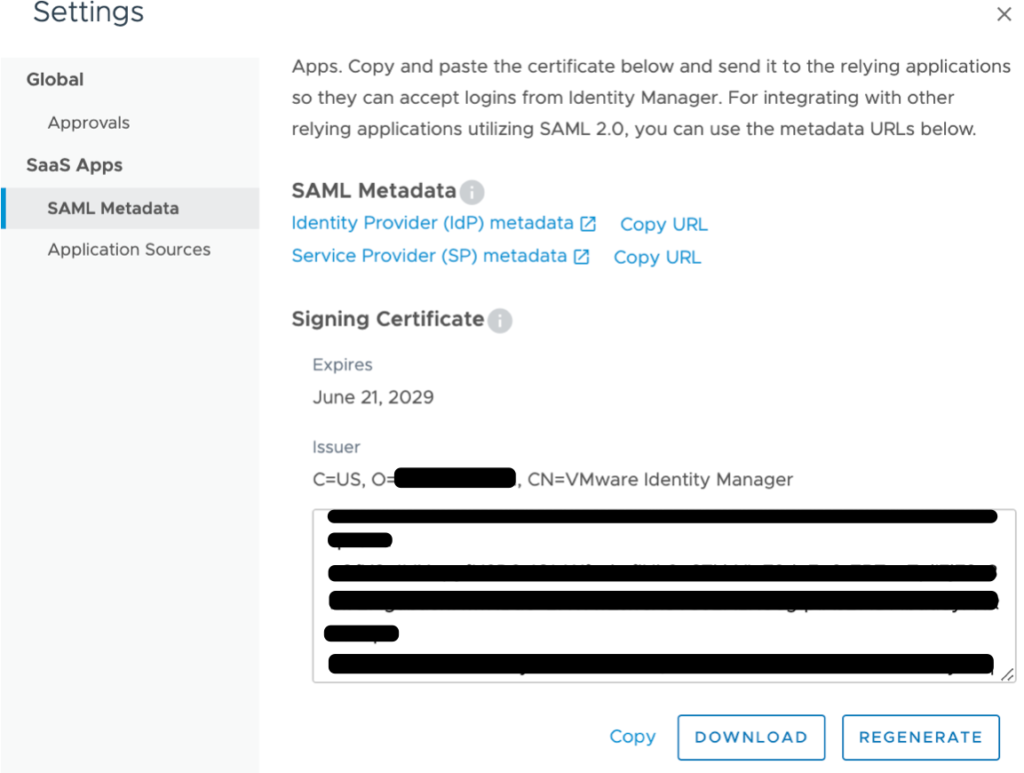
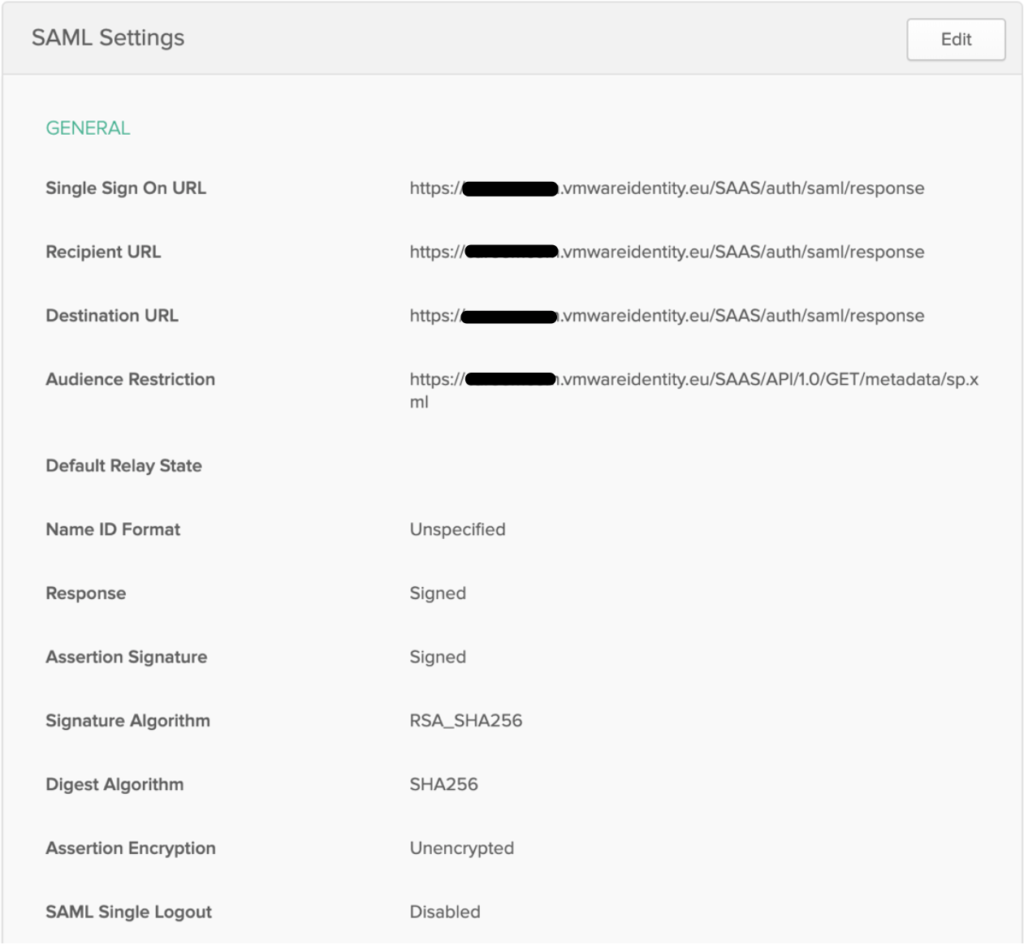
Retrieve SAML Metadata from Workspace ONE Admin Console
Navigate to your Workspace ONE tenant and log in. Click Catalog > Web Apps > Settings. Open SAML IDP Metadata. Click Identity Provider (IdP) Metadata to open the metadata file in a new browser tab.
Scroll down. Click on Download to download the Signing Certificate file. Click Save to save the certificate file locally on your computer.
Add Identity Provider in Okta
Log in to your Okta admin console.
- Click Security > Identity Providers > Add Identity Provider
- Enter the IdP Username, for example, Workspace ONE
- Select idpuser.subjectNameId from the IdP Username drop-down menu
- Select Okta Username from the Match Against drop-down menu
- Copy the entityID URL from the SAML metadata file into the IdP Issuer URI box
- Copy the SingleSignOnService URL for HTTP-Redirect into the IdP Single Sign-On URL box
- Click Browse File to upload the IdP Signature Certificate
- Select the signingCertificate file downloaded from the Workspace ONE tenant
- Click Add Identity Provider
The next steps help you download and copy the Okta SAML metadata for the newly created identity provider in Okta.
Click Download Metadata. Save the metadata file locally on your computer. Click Save. Open the metadata file on a text editor and copy the contents of the file to your clipboard
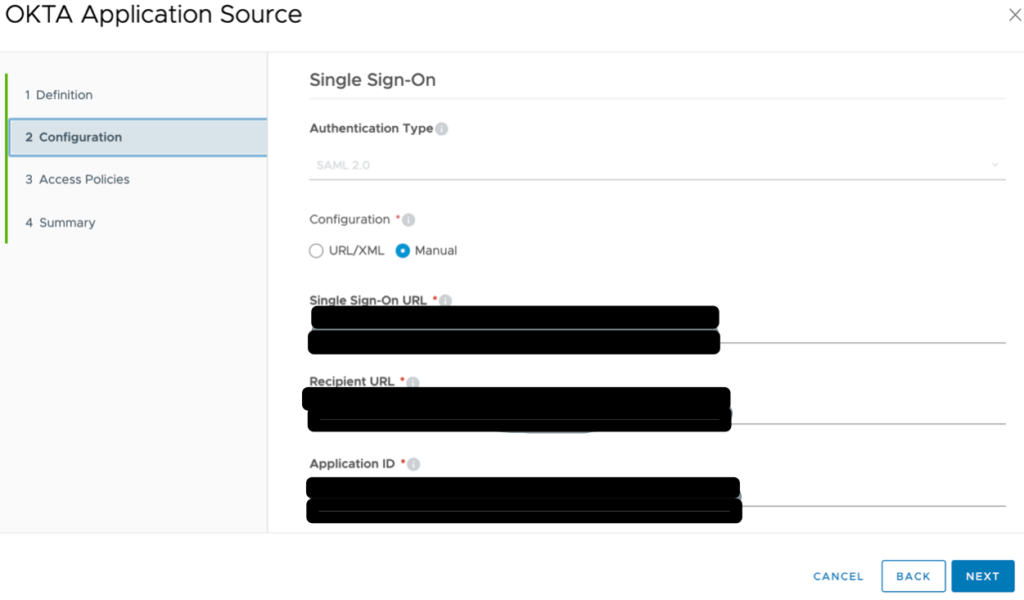
Configure Okta as an Application Source in Workspace ONE
Return to your Workspace ONE admin console. Click Application Sources > Click OKTA. Paste the contents of the metadata file into the URL/XML text box. Click Next
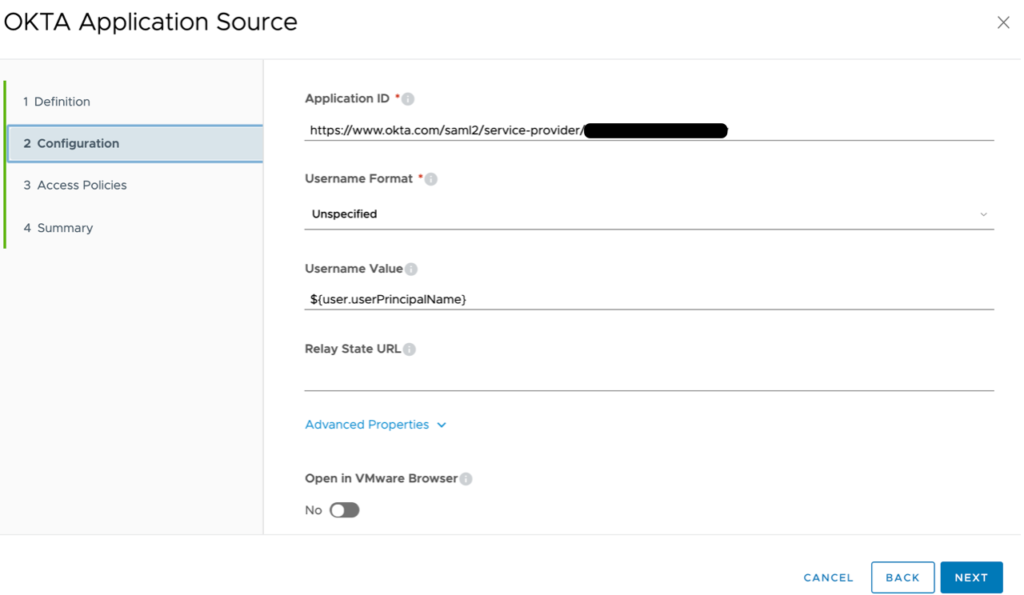
Select the newly created authentication policy from the drop-down menu. Click Save. Click Okta to navigate back into the Application Source configuration. Click Configuration. Change the Username Value field to ${user.userPrincipalName}. This sends the user’s userPrincipalName as the NameID value which matches the user Okta username. Click Save
Creating Routing Rules in Okta
Navigate back to the Identity Providers page in your Okta Admin console. Click Routing Rules > Add Routing Rule.
Enter a friendly name for the Rule Name, for example, Workspace ONE. Select devices: Windows 10 and MacOS.
Scroll down.
Search for and select your test application in the search bar.
4Select Workspace ONE (previously configured IDP connection) from the Use the identity Provider drop-down menu.
Click Create Rule.
Click Activate to active the newly created Routing Rule.
Adding Applications Federated with Okta to the Workspace ONE Application Catalog
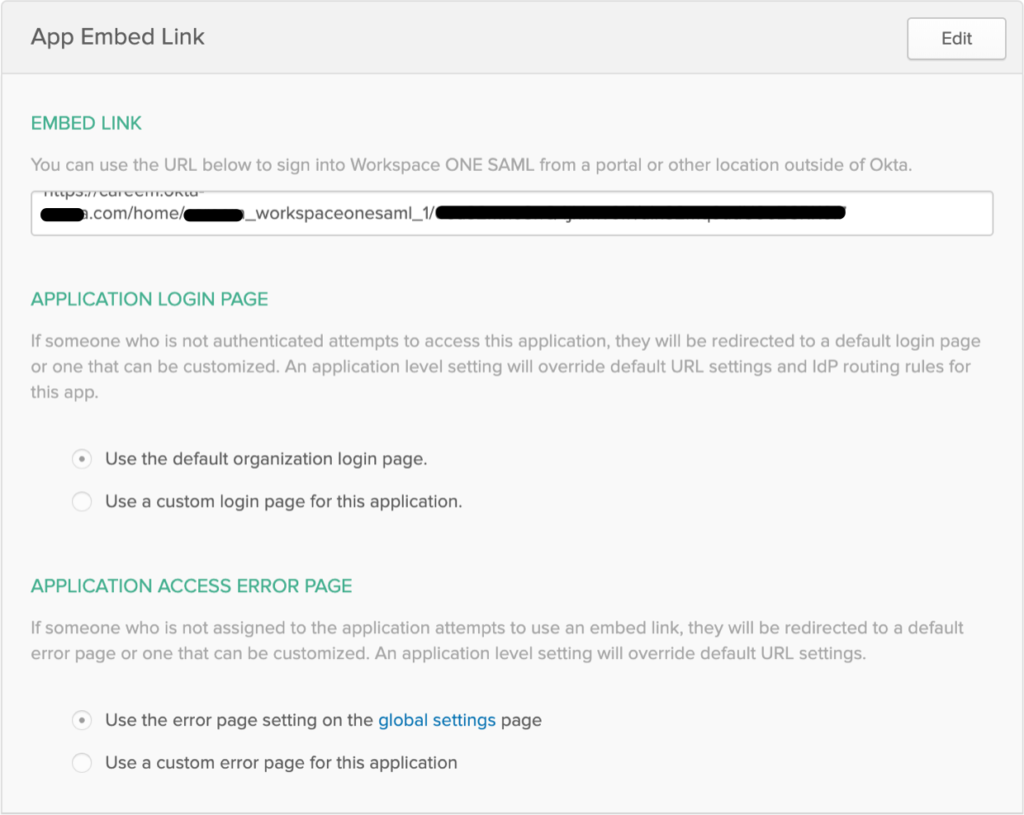
Navigate to the Okta admin console. Click the Applications tab > Applications > Click your application. Navigate to the General tab within your test application configuration. Scroll-down to find the Embed Link value for your test application. Copy this value to your clipboard.
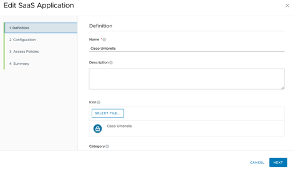
Navigate to the Workspace ONE admin console. Click Catalog > Web Apps >Click New to add a new SaaS application.
Enter a friendly name for your SaaS application.
Click Next.
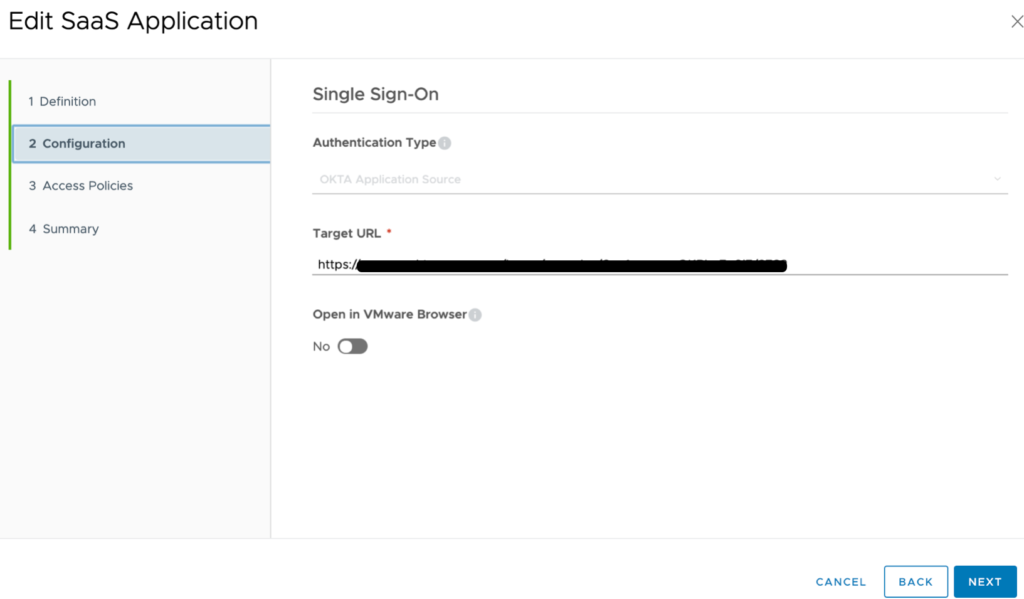
Select Okta Application Source from the Authentication Type drop-down. This application will inherit the SAML configuration
that was already done for the Okta application source.
Paste the application embed link that was copied from the application configuration in the Okta tenant.
Click Next.
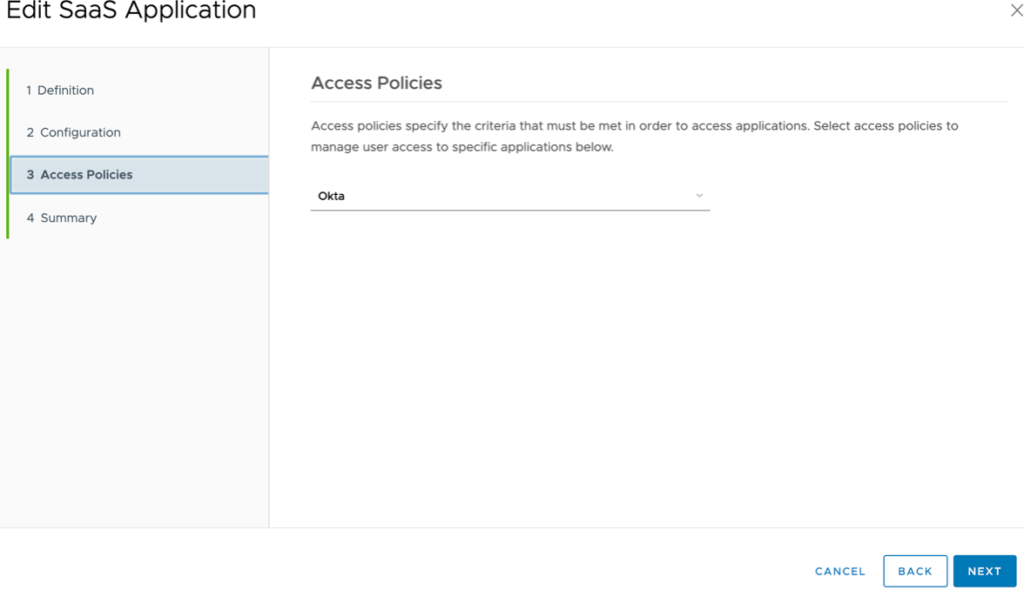
Select an access policy for your SaaS application from the Access Policy drop-down.
Click Next.
Click Save & Assign.
Search for the test user or group to assign this application.
Select Automatic from the Deployment Type drop-down menu. Click Save.
Click Save.

Configure Just-In-Time users provisioning
Just-in-Time provisioning provides another way of provisioning users in the VMware Identity Manager service. Instead of syncing users from an Active Directory instance, with Just-in-Time provisioning users are created and updated dynamically when they log in, based on SAML assertions sent by the identity provider
Start Create New Identity Provider in Workspace ONE
Login to the Workspace ONE Administration Console with Administrator privileges or any other role entitled
to add a Third-Party Identity Provider Click the Identity & Access Management tab, navigate to the Identity Provider sub menuand click the Add Identity Provider button. Select Create Third Party IDP
Navigate to the bottom of the form and locate the SAML Metadata item and open the link in a new tab. In the SAML Metadata locate the following information:
a. entityID
b. HTTP-POST AssertionConsumerService Location
Create new SAML app in Okta
Login to your Okta org and navigate to the Admin UI. Navigate to Applications -> Applications > Add Application > Create New App. Select Web as the Platform and SAML 2.0 as the Sign on method > Create.
Provide a name for the app: Workspace ONE SAML. Click Next
Single sign on URL: AssertionConsumerService URL (Retrieved from the metadata in the previous section).
Audience URI (SP Entity ID): entityID (Retrieved from the metadata in the previous section).
Click Next. Select the I’m an Okta customer adding an internal app button. Check the This is an internal app that we have created box. Click Finish
From the Settings section of the Sign On sub-menu for the new application locate and copy the URL for the Identity Provider metadata.
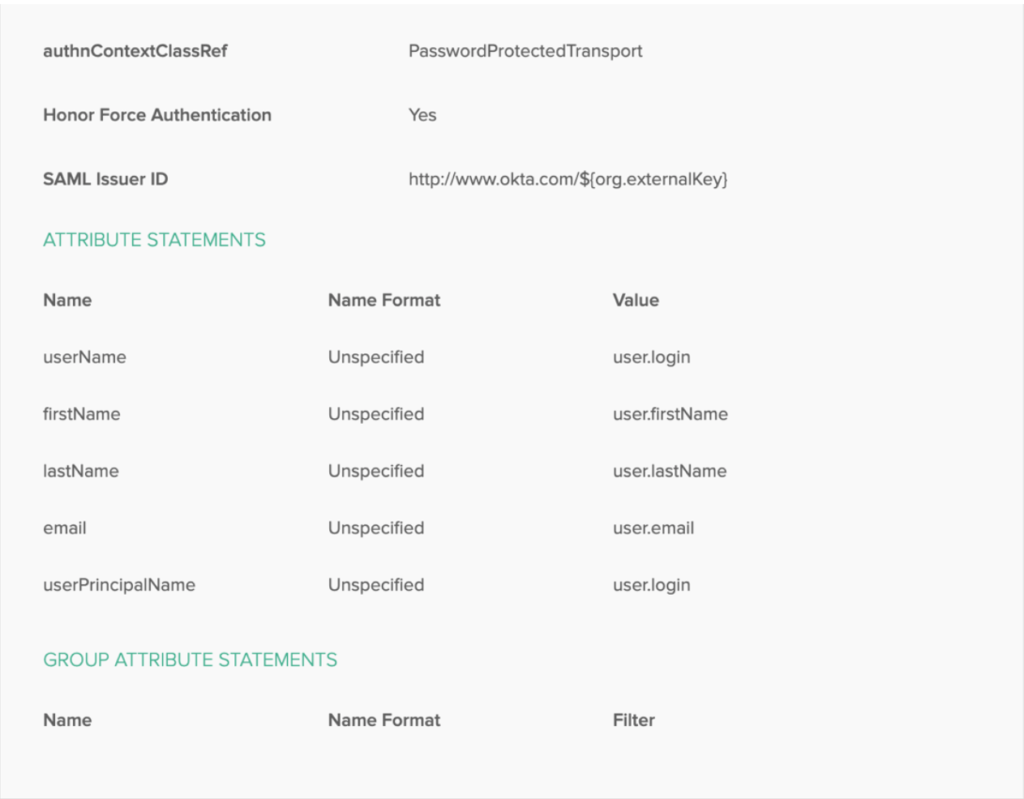
Configure Attribute Statements.
Returning to the Workspace ONE to complete the creation of the new identity provider.
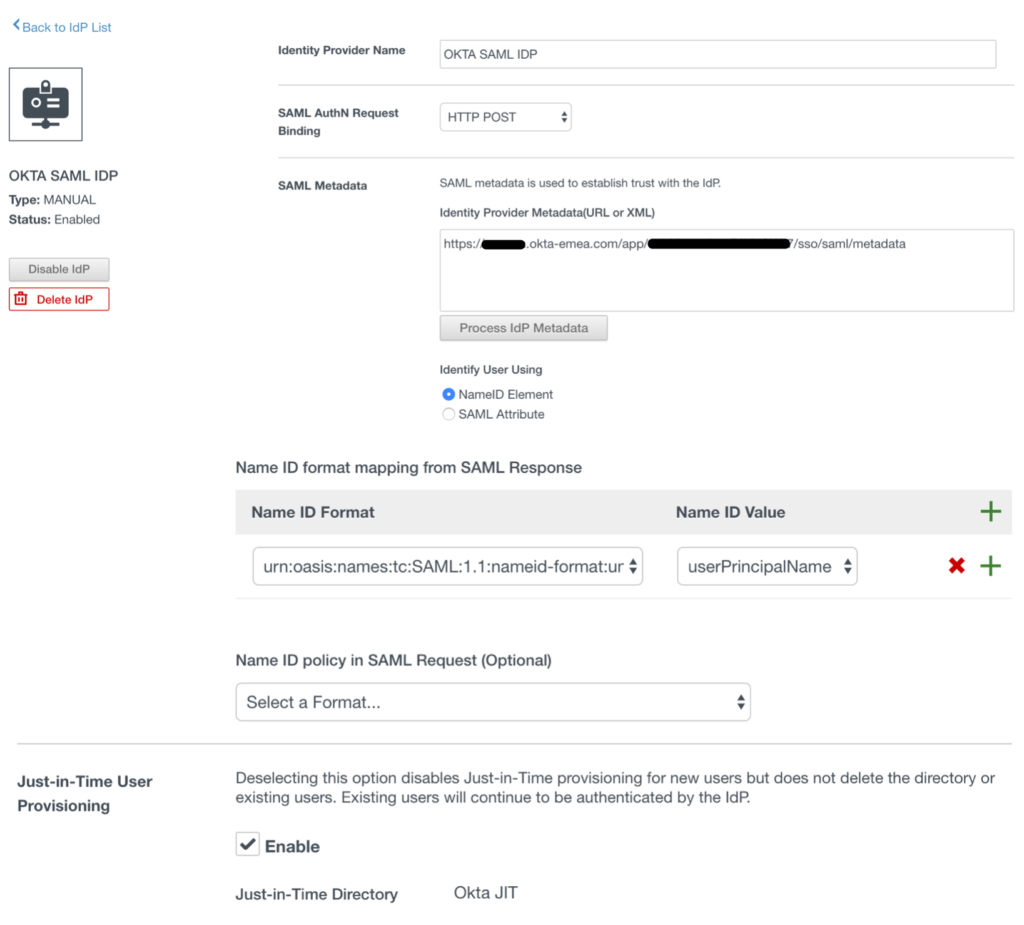
Identity Provider Name: Okta SAML IdP
SAML AuthN Request Binding: HTTP Post
SAML Metadata: metadata URL copied from Okta
After pasting the metadata URL from Okta click the Process IdP Metadata button
In the Name ID format mapping from SAML Response section
a. Name ID Format: urn:oasis:names:tc:SAML:1.1:nameid-format:unspecified
b. Name ID Value: userPrincipalName
Enable option for Just-in-Time user provisioning
Select the User Attribute that the application username value defined in Okta will match
Users: Select the directories you want to be able to authenticate using this IdP
Network: Select the networks which can access this IdP
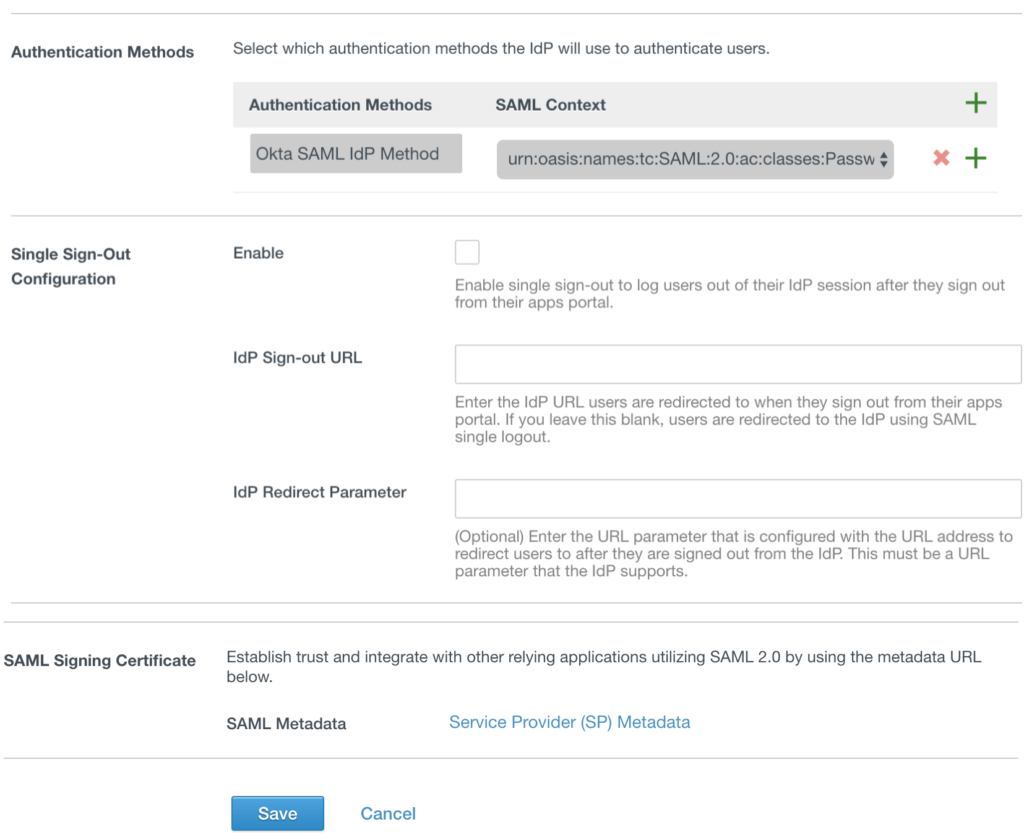
Authentication Methods
Authentication Methods: Okta SAML IdP Method
SAML Context: urn:oasis:names:tc:SAML:2.0:ac:classes:PasswordProtectedTransport
Click Add
Add newly created Authentication method to an Access Policy in Workspace ONE
Click the Identity & Access Management tab > Navigate to the Policies sub menu >Edit default_access_policy:
a. If a user’s network range is: ALL RANGES
b. and user accessing content from: Windows 10
c. and user belongs to group(s): Empty (all users)
d. Then Perform this action: Authenticate User…
e. then the user may authenticate using: Okta SAML IdP Method
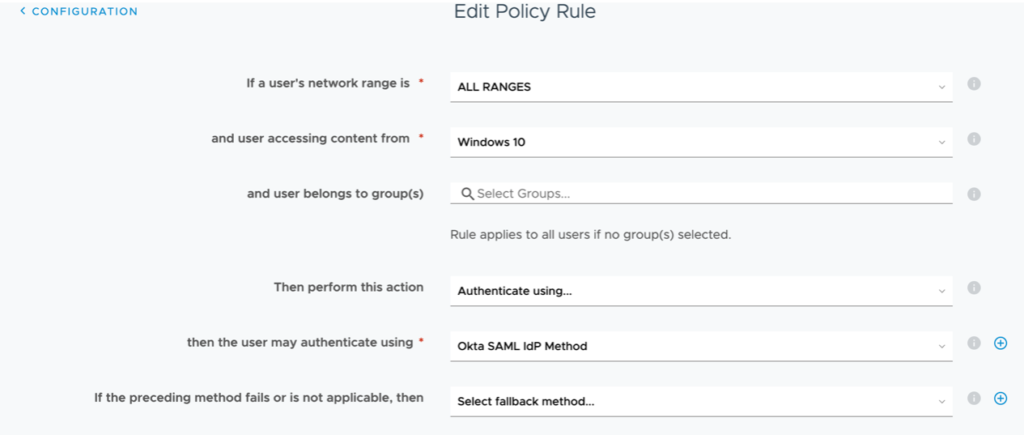
Configure same for MacOS devices and move Windows 10 and MacOS to the top:
References:
Integrating Okta: VMware Workspace ONE Operational Tutorial: https://techzone.vmware.com/integrating-okta-vmware-workspace-one-operational-tutorial
Advanced integrations with Okta: VMware Workspace ONE: https://www.okta.com/sites/default/files/Okta-3rd-Party-UEM-Interop_Workspace-ONE.pdf
Workspace One – Enabling Certificate Based Access – Windows 10/mac: https://blog.eucse.com/workspace-one-enabling-certificate-based-access-windows-10-mac/
VMware Identity Manager Administration: https://docs.vmware.com/en/VMware-Identity-Manager/19.03/idm-administrator.pdf